Explanation of the ems Server Tool
The ems Server Tool enables the control of local printers, the upload of scanned documents and much more. The following functions are supported by the ems Server Tool:
- Sending the configuration of the local computer or one or more print servers
- Downloading and printing reports (reports)
- Uploading documents from a directory
- Synchronizing the data with one or more time recording terminals
- Managing the Windows service
- The execution of maintenance jobs, for example, the cyclic sending of emails
The application consists of two parts, one part is the graphical user interface and allows to execute all functions directly. A Windows service is available as the second part. It is not mandatory to use the Windows service, but the Windows service allows to perform the work in the background. By caching the printouts, it is not necessary for the application to always be running.
Installation
Download the installation program here and run the program. In the installation program, you must activate the “ems Server Tool” option. The installation program optionally installs the Windows service for you as well. After installation, you will find the “ems Server Tool GUI” application in the start menu.
Details about the installation program can be found here.
Note on the print function
Printing documents is also possible without ems Server Tool without any problems. The ems server tool is only used if precise control of the printer is required. This is necessary, for example, when controlling the shaft or when printing ESR (payment slips).
The user can set up the printers of the ems server tool in the ems web. If a printer from the ems Server Tool is used, the printout is automatically buffered. As soon as the ems Server Tool as an application or the Windows service of the Client Tool retrieves the data and forwards it to the local printer, the printout on the server is deleted.
Configuration of the ems Server Tool
“Settings” tab (connections)

The connections to the ems web service are entered in the Settings tab. The Server Tool can be connected to several ems systems at the same time. This makes it possible to control, for example, a test system and a productive system with the same tool. Each instance has its own configuration and is independent of the other instance.
In the overview list you will find all connections and the current status and version of the web service.
New System button
With the “New system” function, a dialog opens with which a new connection can be entered.
The URL to your system must be stored for this (you can find the valid connect URL for you in your EMS system under System settings in the Web services section). The name will normally be https://***.e**-connect.ch. If the connection is successful, the setting is saved. It is not possible to create a setting for a non-existent system.
After creating the system, it must be configured in the ems Web.
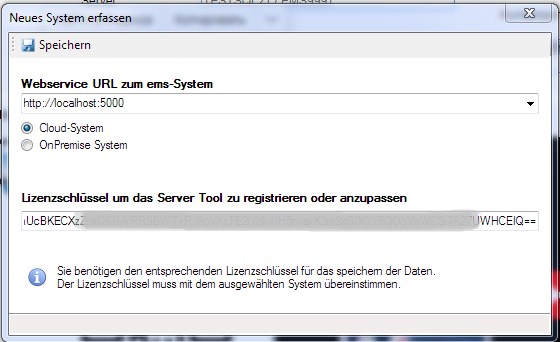
The license key is required to register the system. You can find this in your ems system under System information in the License key section. (With the help of the copy button you can copy it for further insertion here)
“Log file” button
If you encounter problems while using the Windows service, you will find a log file in the same directory as the application. This provides information about the activities of the Windows service.
“Synchronization” tab

The “Synchronization” tab is used for tests or manual execution of functions.
Sync button
Activate the functions you want to execute and then click on “Start synchronization”. The system will now execute all functions one after the other. Execution only takes place if the configuration allows it.
“Send configuration” button
If you encounter problems while using the Windows service, you will find a log file in the same directory as the application. This provides information about the activities of the Windows service.
Print tab

The “Print” tab allows you to send the local configuration of the printers to the ems system. Only when the configuration is known to the ems system can a printer be selected and used in the web application.
Server list: Enable the “Enable printing on these servers” function. The system will automatically suggest the local computer as the print server. However, you can customize this as you wish and specify one or more print servers. Enter multiple print servers separated by semicolons (eg Server1;Server2;Server3).
Printer list: Select all printers to which you want to print. Only the marked printers can be used. When the ems Server Tool is started again, printers that have already been transferred to the ems system are already pre-marked.
Send configuration: Send the configuration to the ems system after saving. Attention: This process may take some time. In addition, all printers are addressed by the ems client tool. If the printer driver is still missing, you will receive information about installing the printer driver.
Important: If “OnPremise” was selected in the basic settings, all print jobs are sent directly to the print server and not printed via the ems client tool.
Update tab

ems server tool service
steering

Print screen of Register Windows service
The Windows Service page allows you to control the Windows Service. The service can be started and stopped manually on this page. The Windows service allows to perform the tasks, for example printing, in the background. This is also independent of a registered user. Important: for the service to work, the settings must be saved as administrator. Active control of the Windows service also requires administration rights.
If the Windows service is not installed, this will be indicated to you. If the service is installed correctly, the current status is displayed.
Start / stop service:
Start or stop the Windows service. Attention: If the Windows service is at work, stopping it may take some time.